In this tutorial we see how to create new projects in KEIL uVision 5 for LPC1768 Cortex-M3 MCU. It also applies for other lpc176x devices like LPC1769. Keil uV 5 is much different than older KEIL uV4. uVision 5 has integrated pack installer which can used to install specific MCU family packs and other libraries. To create project for any Cortex-M or other ARM based MCU you will first need to install MDK5 software packs for your microcontroller family. Either you can download it separately or do it from with the IDE. I recommend adding software packs using IDE. The steps are as given below:
1) Installing prerequisite – LPC1700 Keil software pack
Step A. Download latest Keil MDK uVision5 from Keil’s website.
Step B. Install Keil uVision 5 to default path.
STEP C. Open Keil 5 and click on “Pack Installer” icon as shown below:

STEP D. On the left half on the window, under “Devices” type “lpc1768” in search box and select the MCU in the list below. Now, on the right half of the window click on the “install” button which is towards to the right of “Keil:LPC1700_DFP”. After this pack installer will download the required pack files for our MCU.

Alternatively, you can manually download the software pack and install it directly from MDK5 Software Packs. It will be present Under “KEIL->NXP LPC1700 Series Device Support, Drivers and Examples for MCB1700”.
STEP E. After installing from Pack Installer you will get a confirmation to reload packs. Click “Yes” as shown below:

2) Step by step Keil 5 new project Tutorial
Okay, so now we have the necessary packs installed to create our first project in Keil 5. Just follow the steps mentioned below to create a new project in Keil uV 5 or if your project is not working properly:
Step 1. Open the Keil IDE, under main menu goto “Project->New uVision Project…” and a window prompt will open asking to save the new project. Type your desired project name and save.


Step 2. After that, a new window will appear as shown below. Make sure “Software Packs” is selected for the 1st drop down. In the search box below it, type “lpc1768” and then select the device from list below. Finally click “OK”.

Step 3. Now, inside the “Manage Run-Time Environment Window” select the check boxes for “CORE” under “CMSIS” and “Startup” under “Device”. If you want to select any other libraries you can do so by selecting the respective checkboxes. Selecting “Startup” will automatically added all the necessary startup/boot files required for LPC17xx device, so we don’t have to import them from external sources. The selection of libraries can be changed any time later.

Step 4. Now click on “Options for Target” button as shown below:

Make sure the settings match as shown below.

Step 5. Now, click on the “Output” tab. If you want to generate hex file then you can check “Create HEX File”.

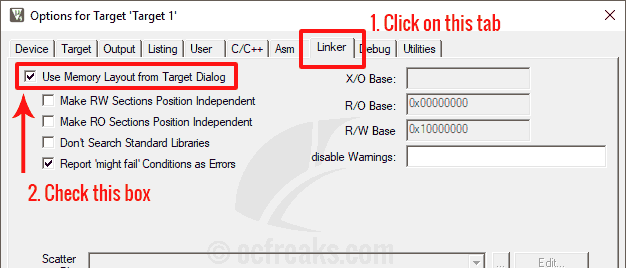
Step 6. Then click on the “Linker” tab and Under that tab check the checkbox option which says “Use Memory Layout from Target Dialog”.

Step 7.Now, under the “Debug” tab, change the values for “Dialog DLL” and “Parameter” under both simulation and hardware debugger settings group. You can select “Use Simulator” to debug your code using simulator itself. If you are using JTAG programmer or any other hardware debugger supported by KEIL then you can select it from top-right drop down box. We will see flashing and debugger options in detail in an upcoming post. Finally to click “OK” to apply settings and close window.

*** error 65: access violation at 0x400FC1A0 : no 'write' permission
Step 8. Now, in the source navigation pane on the left area, right click on “Source Group 1” and select “Add New Item to Group ‘Source Group 1′”.

Step 9. A new window will pop-up to add an item as shown below. Select “C++ File (.cpp)” or C File (.c) , then enter the name of the file in the text box to the right of “Name:” and click “Add”.

Step 10. Now you can write your code in the editor. To compile your program Press “F7” key or in the main menu goto “Project->Build Target”. To check for any compilation errors you can have a look at the build output at the bottom of main window. A screenshot of the Keil MDK uVision 5 is given below. The top red box shows the Source Tree Navigation and the bottom red box shows the build output.

Step 11. To initiate a debug session using simulator or debug hardware/probe click “Debug->Start/Stop Debug Session” or you can hit “Ctrl+F5” as shown below:

Keil 5 under Debug Session :

You can stop the session using the “Debug” menu or but hitting “Ctrl+F5” again.
Keil 5 example project download
Download Keil uVision 5 LPC1768 example/demo project archive below:
After this, you are now ready to create your own Cortex-M3 LPC176x projects in Keil uVision5. If you are facing any problems/issues making or compiling projects for lpc1768/lpc1769 or any other Cortex-M MCU in Keil uVision 5 let me know by commenting to this post below.
