
In this tutorial I will discuss the interfacing of LM35 Temperature sensor with ARM Cortex-M3 LPC1768 Microcontroller. LM35 is a well known low cost temperature sensor and is directly calibrated in Degrees Celsius meaning that the output voltage is directly proportional to Degrees Celsius readings. It has a measurement range is between -55°C to 150°C giving typical accuracy(s) of 0.25°C at room temperature and 0.75°C for full range. LM35 Temperature sensor also supports a wide range of supply voltage from 4V to 30V and is available in 4 different packages viz. TO-CAN, TO-92, SOIC and TO-220.
LM35 Pinout for TO-92 Package:
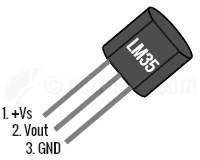

Pin 1 (+Vs) is the positive power supply pin, Pin 2 (VOUT) provides the output voltage linearly proportional to temperature and Pin 3 is for Ground.
LM35 can be configured in two ways giving different ranges:
- Basic Centigrade Temperature Sensor (2°C to 150°C)
- Full Range Centigrade Temperature sensor (-55°C to 150°C)
To keep things simple, we will interface LM35 in basic configuration. The first thing to note when interfacing LM35 with 3.3v MCUs, like LPC1768/LPC1769, is that LM35 has a supply voltage range of 4V to 30V. Hence, another supply of say 5V would be required to get proper readings. The second thing to note is that the output voltage has a scale factor of 10mV per Degree Centigrade and this is fixed irrespective of what supply voltage we use apply between 4V to 30V. Hence, the output voltage of LM35 can reach a maximum of 1.5V and a minimum of -55mV when configured as Full Range Centigrade Sensor.
When using the Basic configuration we get an output swing of ~0V(20mV) to 1.5V. So, if we use a VREF of 3.3 Volts we get a resolution of 3.3V/4096 = 0.0008056V or 0.8mV since LPC1768 has a 12-bit ADC. Considering that LM35’s typical accuracy at room temperature(25°C) is 0.25°C (worst case accuracy = 0.5°C @ 25°C) and scale factor of 10mV/°C, a resolution of 0.8mV is more than sufficient.
For the interfacing example given below, we will assume a voltage reference of 3.3V which is commonly used on development boards. If these connections are not present on your development board please make sure VREFP pin is connected to 3.3V reference and VREFN to reference ground (0V).
LM35 Transfer Function & Output Conversion to °C
The formula for VOUT is given as:
Using the above formula, with VERF in Volts and Scale-factor in V/°C, we can compute the temperature(T) from 12-bit ADC Result as:
°C
Which can be simplified as,
°C
So, when using VREF = 3.3V we get,
°C
Example for LM35 Temperature Sensor Interfacing with LPC1768
Now lets go through a simple programming example. As obvious, we will use the ADC block of LPC176x for interfacing our temperature sensor using reference voltage as mentioned above. The result obtained from ADC conversion is converted to temperature(in Deg. Celsius) reading using the equations given above. We will use UART0 to send the data to terminal. You can refer my LPC1768 ADC Tutorial and UART Tutorial for more. The example project linked below also contains retargeted printf() for KEIL which redirects its output to UART0.
LM35 Interfacing Schematic:


Source code:
/*(C) Umang Gajera - www.ocfreaks.com
Interfacing LM35 Temperature Sensor with LPC1768/LPC1769 - Example Source Code for KEIL ARM.
Also see: https://www.ocfreaks.com/lpc1768-adc-programming-tutorial/
More Embedded tutorials @ www.ocfreaks.com/cat/embedded/
License: GPL.*/
#include <lpc17xx.h>
#include <stdio.h> //For retargeted printf() - https://www.ocfreaks.com/retarget-redirect-printf-scanf-uart-keil/
#include "ocf_lpc176x_lib.h" //contains initUART0(), initTimer0() & putc() to retarget printf()
#define ADC_CLK_EN (1<<12)
#define SEL_AD0_0 (1<<0) //Select Channel AD0.0
#define CLKDIV 1 //ADC clock-divider (ADC_CLOCK=PCLK/CLKDIV+1) = 12.5Mhz @ 25Mhz PCLK
#define PWRUP (1<<21) //setting it to 0 will power it down
#define START_CNV (1<<24) //001 for starting the conversion immediately
#define ADC_DONE (1U<<31) //define it as unsigned value or compiler will throw #61-D warning
#define ADCR_SETUP_SCM ((CLKDIV<<8) | PWRUP)
#define VREF 3.3 //Reference Voltage at VREFP pin, given VREFN = 0V(GND) - not used in this example.
int main(void)
{
//SystemInit(); //Gets called by Startup code, sets CCLK=100Mhz, PCLK=25Mhz
initUART0(); //Initialize UART0 for retargeted printf()
initTimer0(); //For delayMS()
LPC_SC->PCONP |= ADC_CLK_EN;
LPC_PINCON->PINSEL1 |= (1<<14); //select AD0.0 for P0.23
LPC_ADC->ADCR = ADCR_SETUP_SCM | SEL_AD0_0;
int result = 0;
float temp = 0;
printf("OCFreaks.com LPC176x LDR Interfacing - Example 1.\n");
while(1)
{
LPC_ADC->ADCR |= START_CNV; //Start new Conversion (Software controlled)
while((LPC_ADC->ADDR0 & ADC_DONE) == 0); //Wait untill conversion is finished
result = (LPC_ADC->ADDR0>>4) & 0xFFF; //12 bit Mask to extract result
temp = ((float)result * VREF * 100)/4096; //As per the Equation given in the tutorial
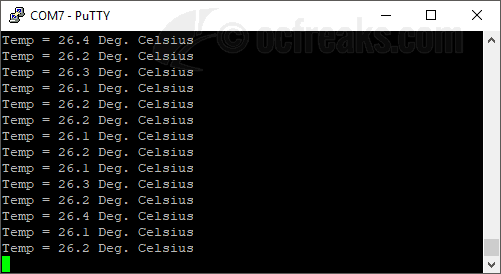
printf("Temp = %0.1f Deg. Celsius\n" , temp);
delayMS(500); //Slowing down Updates to 2 Updates per second
}
//return 0; //This won't execute
}
KEIL ARM uV5/uV4 Project for example given above is on GitHub @ LM35 Temperature Sensor Interfacing with LPC1768 [Successfully tested on Keil uV5.23], Download Project Zip. You can find the HEX file inside objects folder.
Screenshot:

Reference(s):